
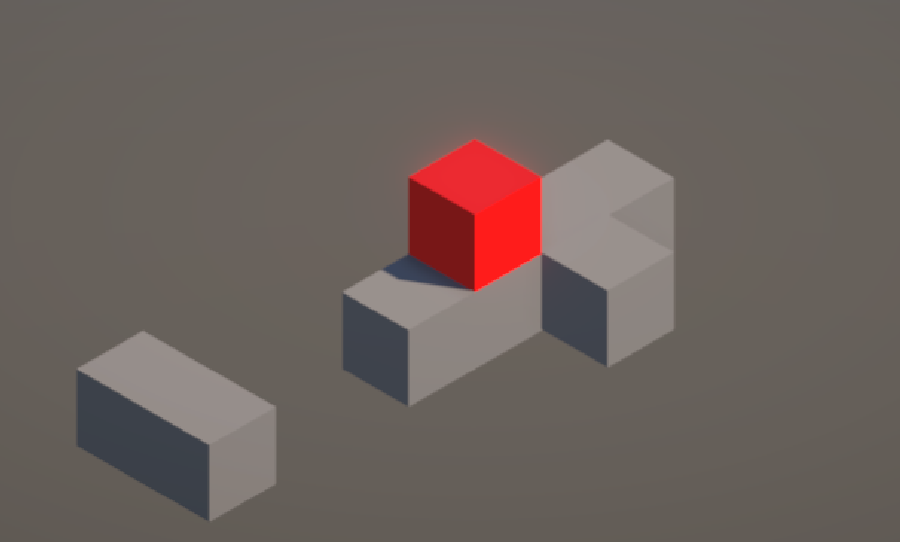
分享一下我做的一个Unity小demo,玩法大致类似于纪念碑谷(Monument Valley)
项目地址
yzs020220/MonumentValley-like-demo
玩法实现
玩法的实现主要参考了油管博主MixAndJam的视频:视频地址,输入使用了Unity Input System来实现相机旋转
监听鼠标点击与位置
鼠标左键点击
新建Action命名为Move,Action Type选择为Button,Action下新建binding,Path选择为Left Button[Mouse]
在角色控制脚本中编写OnMove方法
public void OnMove(InputAction.CallbackContext context)
{
    if (context.started)
    {
    // 角色移动
    }
}
鼠标位置
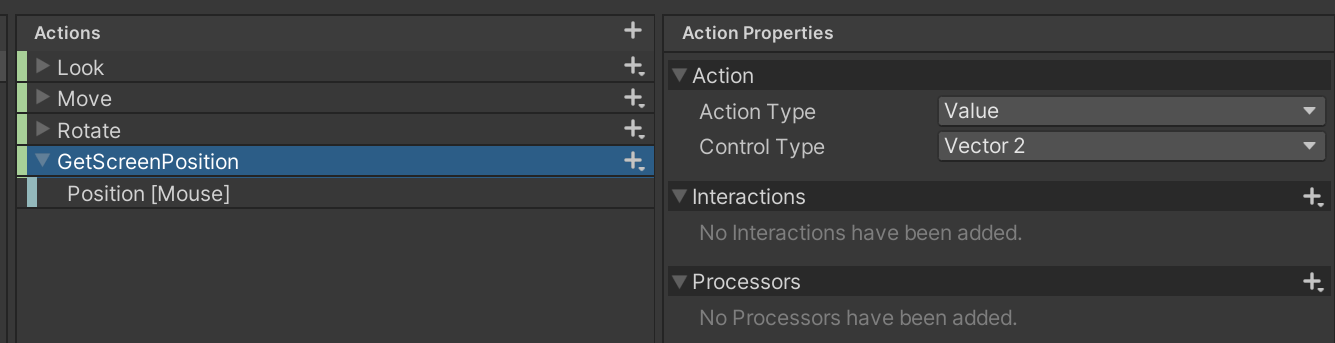
在Unity Input System中新建Action,Action Type选择Value,Control Type选择Vector 2,Action下新建Binding,Path选择为Position[Mouse]
 获取鼠标位置
在角色控制脚本中编写OnGetScreenPositon方法
private Vector2 _clickScreenPos;
public void OnGetScreenPosition(InputAction.CallbackContext context)
{
    _clickScreenPos = context.ReadValue<Vector2>();
}
在PlayerInput中将其调用
新建empty,添加Player Input, Behavior选择Invoke Unity Event, 在PlayerInput中调用方法
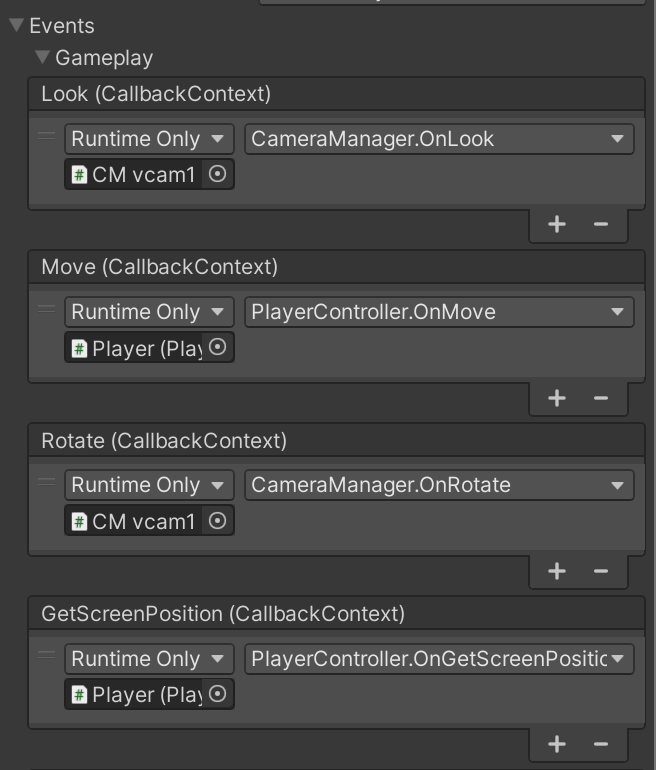 在PlayerInput中调用方法
射线检测方块
检测自身所站的方块
在自身位置向下射出一个射线检测碰撞体,如果碰撞体带有方块的脚本,那么返回方块
void RayCastDown()
{
    Ray playerRay = new Ray(transform.GetChild(0).position, -transform.up);
    RaycastHit playerHit;

    if (Physics.Raycast(playerRay, out playerHit))
    {
        if (playerHit.transform.GetComponent<Walkable>() != null)
        {
            curCube = playerHit.transform;
        }
    }
}
检测鼠标点击的方块
在OnMove方法下检测(左键点击目标方块),射线检测跟上面基本相似
public void OnMove(InputAction.CallbackContext context)
{
    if (context.started)
    {
        RayCastDown();
        Ray mouseRay = Camera.main.ScreenPointToRay(_clickScreenPos);
        RaycastHit mouseHit;
        if (Physics.Raycast(mouseRay, out mouseHit))
        {
            if (mouseHit.transform.GetComponent<Walkable>() != null)
            {
                clickedCube = mouseHit.transform;
            }
        }
    }
}
移动到方块
这一部分出了如何形成图的方法和MixAndJam的视频不同,其他基本是一样的
图的形成
方块是相互独立的,我们可以通过获取它们在屏幕上的位置,比较两个方块之间的距离将它们连接起来,给方块脚本Walkable.cs设置possiblePaths变量
public List<WalkPath> possiblePaths = new List<WalkPath>();在EnvironmentUpdate.cs中,添加PathUpdate方法通过方块的屏幕位置将方块相互连接
public Walkable[] platform;
public Walkable cube0, cube1; // 传入两个相邻的方块以获得它们之间的屏幕坐标(二维向量)距离
public void PathUpdate()
{
    Vector2 cubeSp0 = cube0.GetScreenPoint();
    Vector2 cubeSp1 = cube1.GetScreenPoint();
    float _dist = (cubeSp0 - cubeSp1).magnitude;

    for (int i = 0; i < platform.Length - 1; i++)
    {
        for (int j = i + 1; j < platform.Length; j++)
        {
            platform[i].GetScreenPoint();
            platform[j].GetScreenPoint();
            Vector2 iScreenPos = new Vector2(platform[i].screenPoint.x, platform[i].screenPoint.y);
            Vector2 jScreenPos = new Vector2(platform[j].screenPoint.x, platform[j].screenPoint.y);
            _platformDist = (iScreenPos - jScreenPos).magnitude;

            if (Mathf.Abs(_platformDist - _dist) < .5f)
            {
                WalkPath walkPath0 = new WalkPath();
                WalkPath walkPath1 = new WalkPath();

                walkPath0.target = platform[i].transform;
                walkPath1.target = platform[j].transform;
                walkPath0.active = true;
                walkPath1.active = true;

                platform[i].possiblePaths.Add(walkPath1);
                platform[j].possiblePaths.Add(walkPath0);
            }
        }
    }
}
根据图以及自身所在方块和点击方块生成路径
基本上是按照视频来的,但是我当时写的时候没想太多,其实应该直接用BFS会更好解释(以后有空再改吧,先贴上代码)
点击展开代码
void FindPath()
{
    List<Transform> nextCubes = new List<Transform>();
    List<Transform> pastCubes = new List<Transform>();

    foreach (WalkPath path in curCube.GetComponent<Walkable>().possiblePaths)
    {
        if (path.active)
        {
            nextCubes.Add(path.target);
            path.target.GetComponent<Walkable>().previousBlock = curCube;
        }
    }

    pastCubes.Add(curCube);

    ExploreCube(nextCubes, pastCubes);
    BuildPath();
}

void ExploreCube(List<Transform> nextCubes, List<Transform> visitedCubes)
{
    Transform current = nextCubes.First();
    nextCubes.Remove(current);

    if(current == clickedCube) return;

    foreach (WalkPath path in current.GetComponent<Walkable>().possiblePaths)
    {
        if (!visitedCubes.Contains(path.target) && path.active)
        {
            nextCubes.Add(path.target);
            path.target.GetComponent<Walkable>().previousBlock = current;
        }
    }

    visitedCubes.Add(current);

    if (nextCubes.Any())
    {
        ExploreCube(nextCubes, visitedCubes);
    }
}

void BuildPath()
{
    Transform cube = clickedCube;
    while (cube != curCube)
    {
        finalPath.Add(cube);
        if (cube.GetComponent<Walkable>().previousBlock != null)
            cube = cube.GetComponent<Walkable>().previousBlock;
        else return;
    }
    finalPath.Insert(0, clickedCube);
    FollowPath();
}
移动到方块
用DoTween移动就行(在PackageManager下安装)
void FollowPath()
{
    Sequence s = DOTween.Sequence();
    walking = true;
    for (int i = finalPath.Count - 1; i > 0; i--)
    {
        s.Append(transform.DOMove(finalPath[i].GetComponent<Walkable>().GetWalkPoint() + characterOffset, .2f).SetEase(Ease
        .Linear));
    }

    s.Append(transform.DOMove(clickedCube.GetComponent<Walkable>().GetWalkPoint() + characterOffset, .2f).SetEase(Ease.Linear));

    s.AppendCallback(() => Clear());
}
最后在OnMove方法中调用寻找路径方法即可:
public void OnMove(InputAction.CallbackContext context)
{
    if (context.started)
    {
        RayCastDown();
        Ray mouseRay = Camera.main.ScreenPointToRay(_clickScreenPos);
        RaycastHit mouseHit;
        if (Physics.Raycast(mouseRay, out mouseHit))
        {
            if (mouseHit.transform.GetComponent<Walkable>() != null)
            {
                clickedCube = mouseHit.transform;
                DOTween.Kill(gameObject.transform);
                finalPath.Clear();

                FindPath();
            }
        }
    }
}
相机旋转
功能在我的另一篇博客都有实现,只要在相机旋转完成时再次调用路径更新方法即可
初识Unity Input System视觉效果完善
上面的功能做完之后,你会发现角色从原来方块走到世界座标系中不是相互连接的方块会出现方块与角色相互遮挡,这是因为当角色的路径穿过方块,就会出现所谓的穿模,然而这里我们要实现的就是路径穿过方块所以其实没有办法避免,使用视错觉显得方块是相邻的本身就是一个谎言,那就得有另一个谎言来把这个谎圆起来。
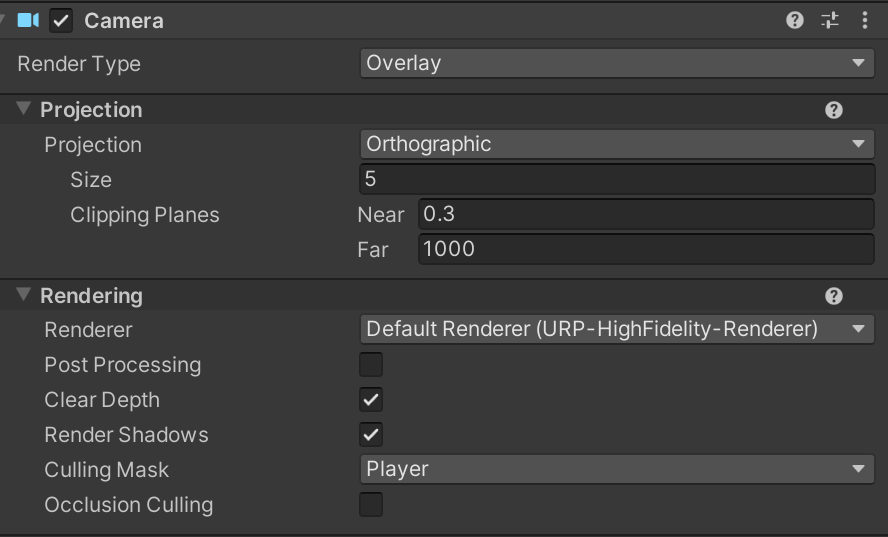
简单来说,其实我们只要让角色显示在脚下的方块前就可以了,因为角色总是踩在方块上面,所以我们只要让角色都显示出来就好了,最简单的实现方法就是使用两个相机,新建一个新的相机,RenderType选择Overlay,Culling Mask选择Player(角色要设置为这个Layer),然后在原相机上的stack中添加该相机,并在原相机的Culling Mask中取消选择Player,这样我们就是实现了这个视觉效果
 新建相机
新建相机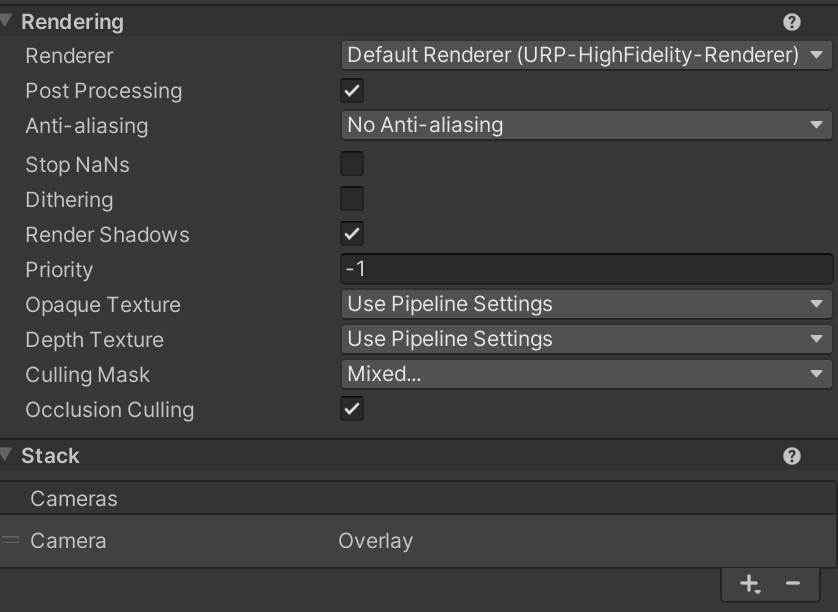 原相机
原相机如果你想为它添加阴影,你可以将角色复制一份然后设置为其他图层,Cast Shadow选择为Shadow Only(只投射阴影)
我这里是很偷懒地给角色这个方块为了一圈剔除背面的Plane(如果你要控制方块总是显示那一个平面也可以用这个方法)